Welcome to Cartsy Doc
Introduction
Cartsy is a modern, responsive and highly customizable multipurpose Html eCommerce template. It built in webpack and using latest bootstrap. Cartsy has 4 pre build demo, 10+ shop pages, 15+ product pages and various inner pages.
Whether you're building a fashion store, electronics shop, furniture outlet, cosmetics brand, or any niche marketplace, Cartsy adapts beautifully to your business needs.
Built with the Latest Technologies:
- Webpack – Advanced bundling, asset optimization, and faster load times.
- Bootstrap 5 – Clean and mobile-first design system.
- SCSS Support – Maintainable and scalable style structure.
Key Features
- PWA: Enjoy an app-like interface with offline access
- RTL support included for better multilingual compatibility.
- Dark Mode eady for a sleek look and comfortable viewing at night.
- Mobile-first responsive design for fast, user-friendly browsing on the go.
- Advanced Features like product filtering, wishlist, cart, quick view, and more
What's Included:
- 50+ Prebuilt Pages (Home, Shop, Product, Cart, Checkout, Blog, Account, etc.)
- 15+ Product Pages with Variant Selection
- Shop Pages with Multiple Layout Variations
- Sidebar & Mega Menu Navigation
- Blog Pages, Contact Form, Account Pages
- Product Quick View, Wishlist, Cart, Checkout
Installation Guide
System Requirements
Before installing, ensure you have the following:
- Node.js 18+ (Download from Node.js Official Website )
- npm or yarn (Installed with Node.js)
- Code Editor (Recommended: VS Code)
Check your Node.js version by running:
node -vDownload & Extract the Template
- Purchase & Download the ZIP file from ThemeForest.
- Go to your ThemeForest Downloads section.
- Click Download and choose "All files & documentation".
- Extract the downloaded ZIP file to your desired location.
Your extracted folder should look like this:
📂 cartsy/
    ├── 📂 documentation/
    ├── 📂 template-files/
Install Dependencies
Navigate to the template-files folder and install dependencies:
cd template-files
npm install

or

yarn install
Run the Development Server
npm run start

or

yarn start
Build for Production
npm run buildFolder Structure Overview
📂 cartsy/
│
├── *.html                    # All html files
│
├── 📂 assets/
│   ├── 📂 css/               # CSS files
│   │
│   ├── 📂 fonts/             # Fonts files
│   │
│   ├── 📂 images/            # All the images
│   │
│   ├── 📂 js/                # JS Files
│   │
│   ├── 📂 scss/              # SCSS files
│   │
│   ├── 📂 videos/            # Videos
│
├── webpack.config.js          # Webpack configuration
├── package.json               # Package dependencies
├── postcss.config.js          # Processing CSS
├── manifest.json              # PWA manifest file with app metadata
├── service-worker.js          # For caching and offline support
Usage Instructions
How to change the colors.
All colors in this template are defined using CSS variables inside the _variables.scss file. The colors are stored in RGB format so can easily adjust opacity using rgba().
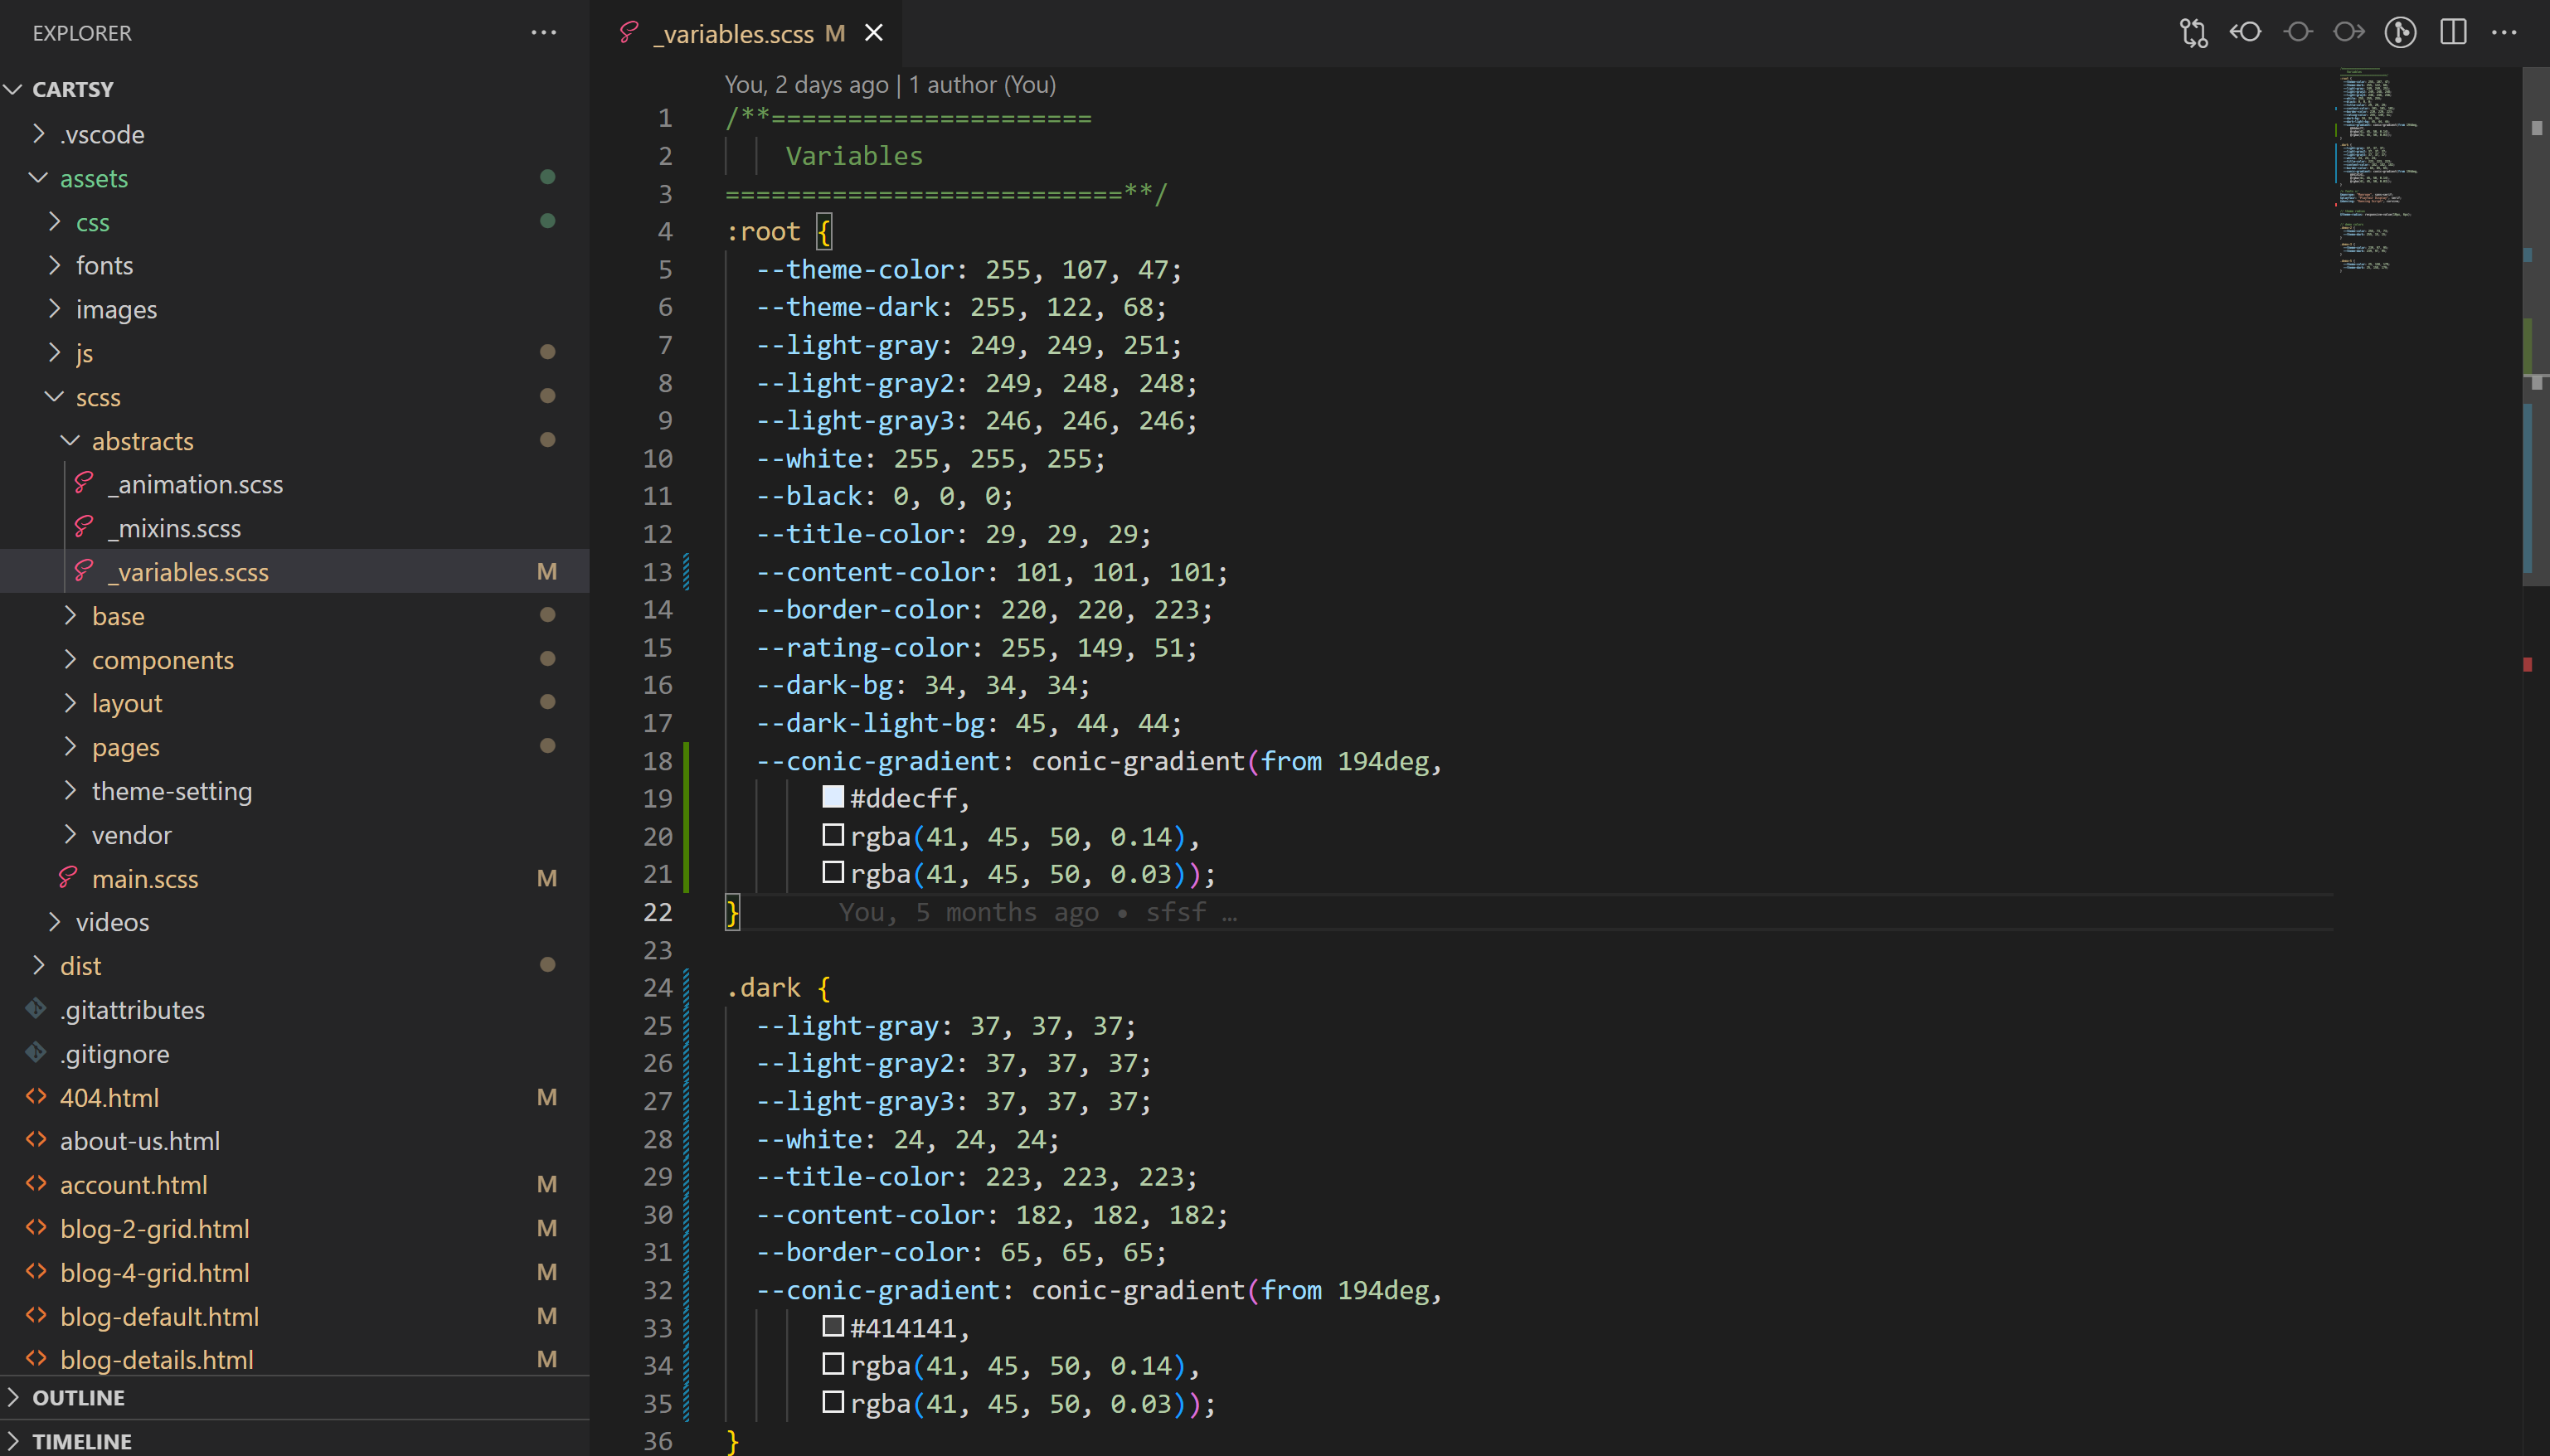
To change the theme color, simply update the RGB values. For example, to set the theme color to blue, change:
--theme-color: 0, 122, 255; /* New theme color */The dark mode colors are defined under the .dark class:
.dark {
    --theme-color: 255, 107, 47;  /* Theme color remains same */
    --white: 23, 34, 40;          /* Adjusted for dark mode */
    --black: 0, 0, 0;
}
Since the colors are stored in RGB format, you must use rgba() to apply opacity.
color: rgba(var(--theme-color), 1); /* Full opacity */
color: rgba(var(--theme-color), 0.8); /* 80% opacity */
How to use RTL Theme
Enabling RTL (Right-to-Left) layout in the template is quick and straightforward. If you are building a website for languages such as Arabic, Hebrew, or Persian, the RTL option ensures that the design, text alignment, and overall flow of the layout adjust properly to match right-to-left reading styles.
To activate RTL mode, simply add the class rtl to the body tag:
// add rtl class
<body class="rtl">
This will automatically switch the template to RTL mode for languages like Arabic and Hebrew.
How to use Default Dark theme
Dark Mode is built into the template to give your website a modern, stylish, and eye-friendly appearance. Many users today prefer browsing in darker themes, especially at night or in low-light environments, as it reduces eye strain and gives the interface a sleek, premium feel.
To enable Dark Mode by default, simply add the class dark to the body tag:
// add dark class
<body class="dark">
This will load the website directly in Dark Mode instead of the default Light Mode.
Customization Guide
Changing Styles
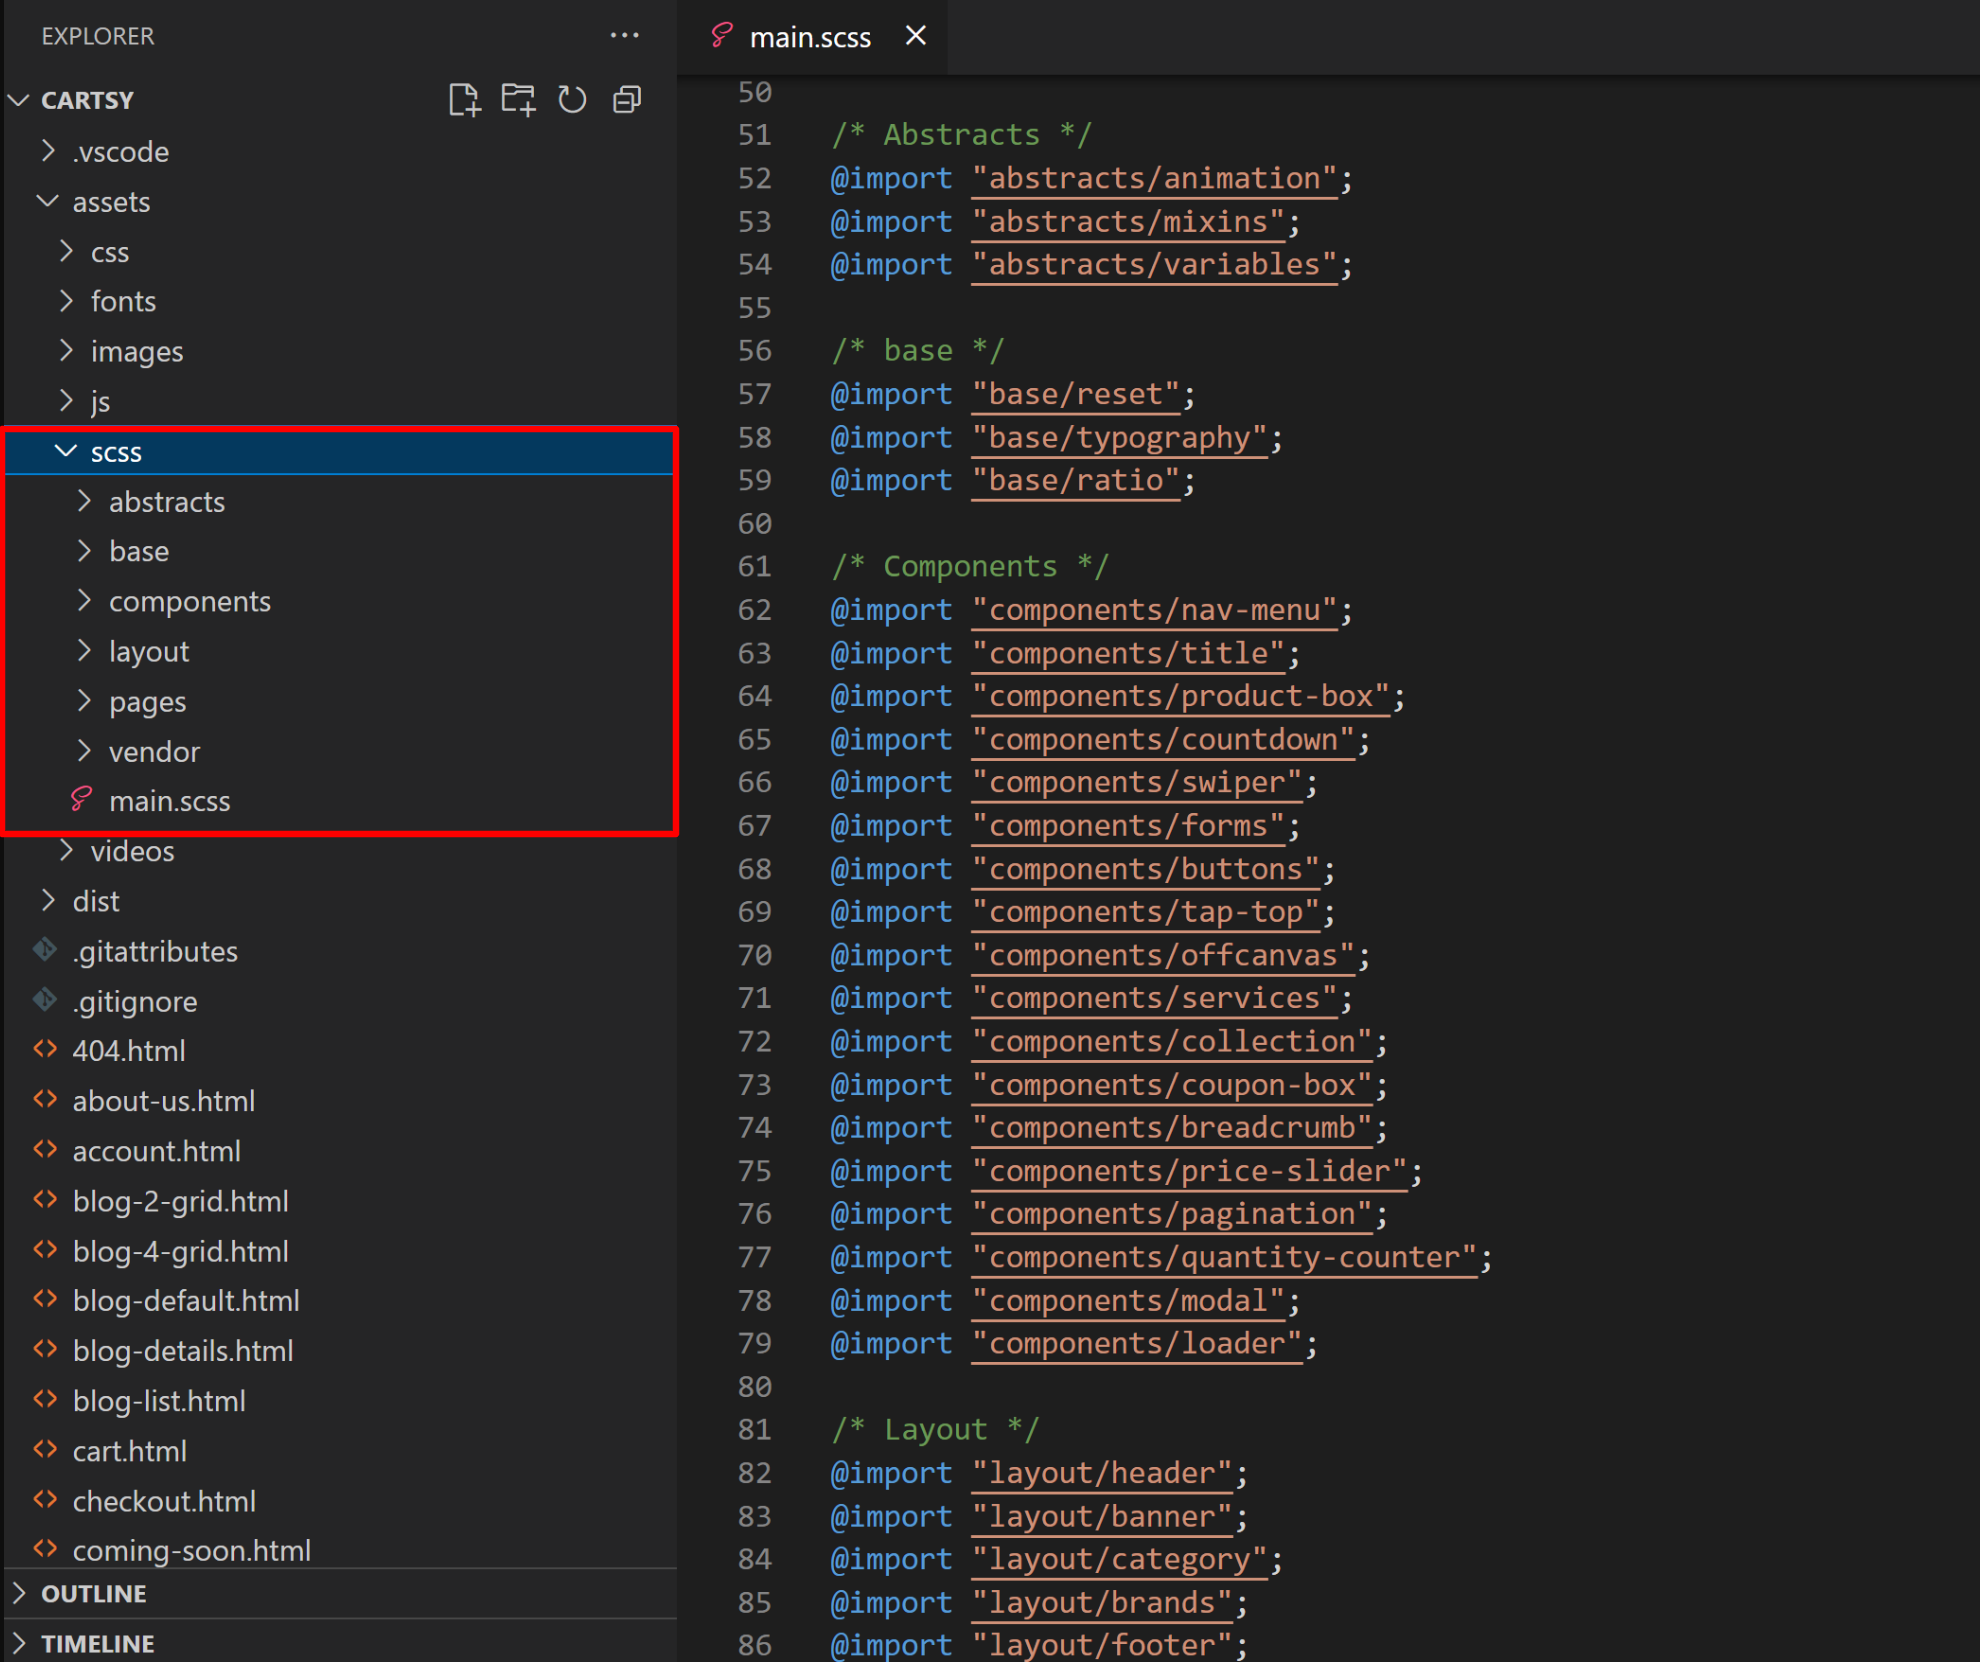
All styles in the template are organized inside the styles folder, following the Sass 7-1 architecture pattern. This well-known structure separates concerns by grouping SCSS files by purpose, making the codebase modular, scalable, and easy to maintain. The main folders include:
- abstracts – Variables, mixins, functions, and helpers
- base – Resets, typography, and base styles
- components – Reusable UI components (buttons, forms, etc.)
- layout – Layout-specific styles (header, footer, category, etc.)
- pages – Page-level styles
- vendor – Third party libraries
- main.scss – The entry point that imports all partials
Change Favicon & Title
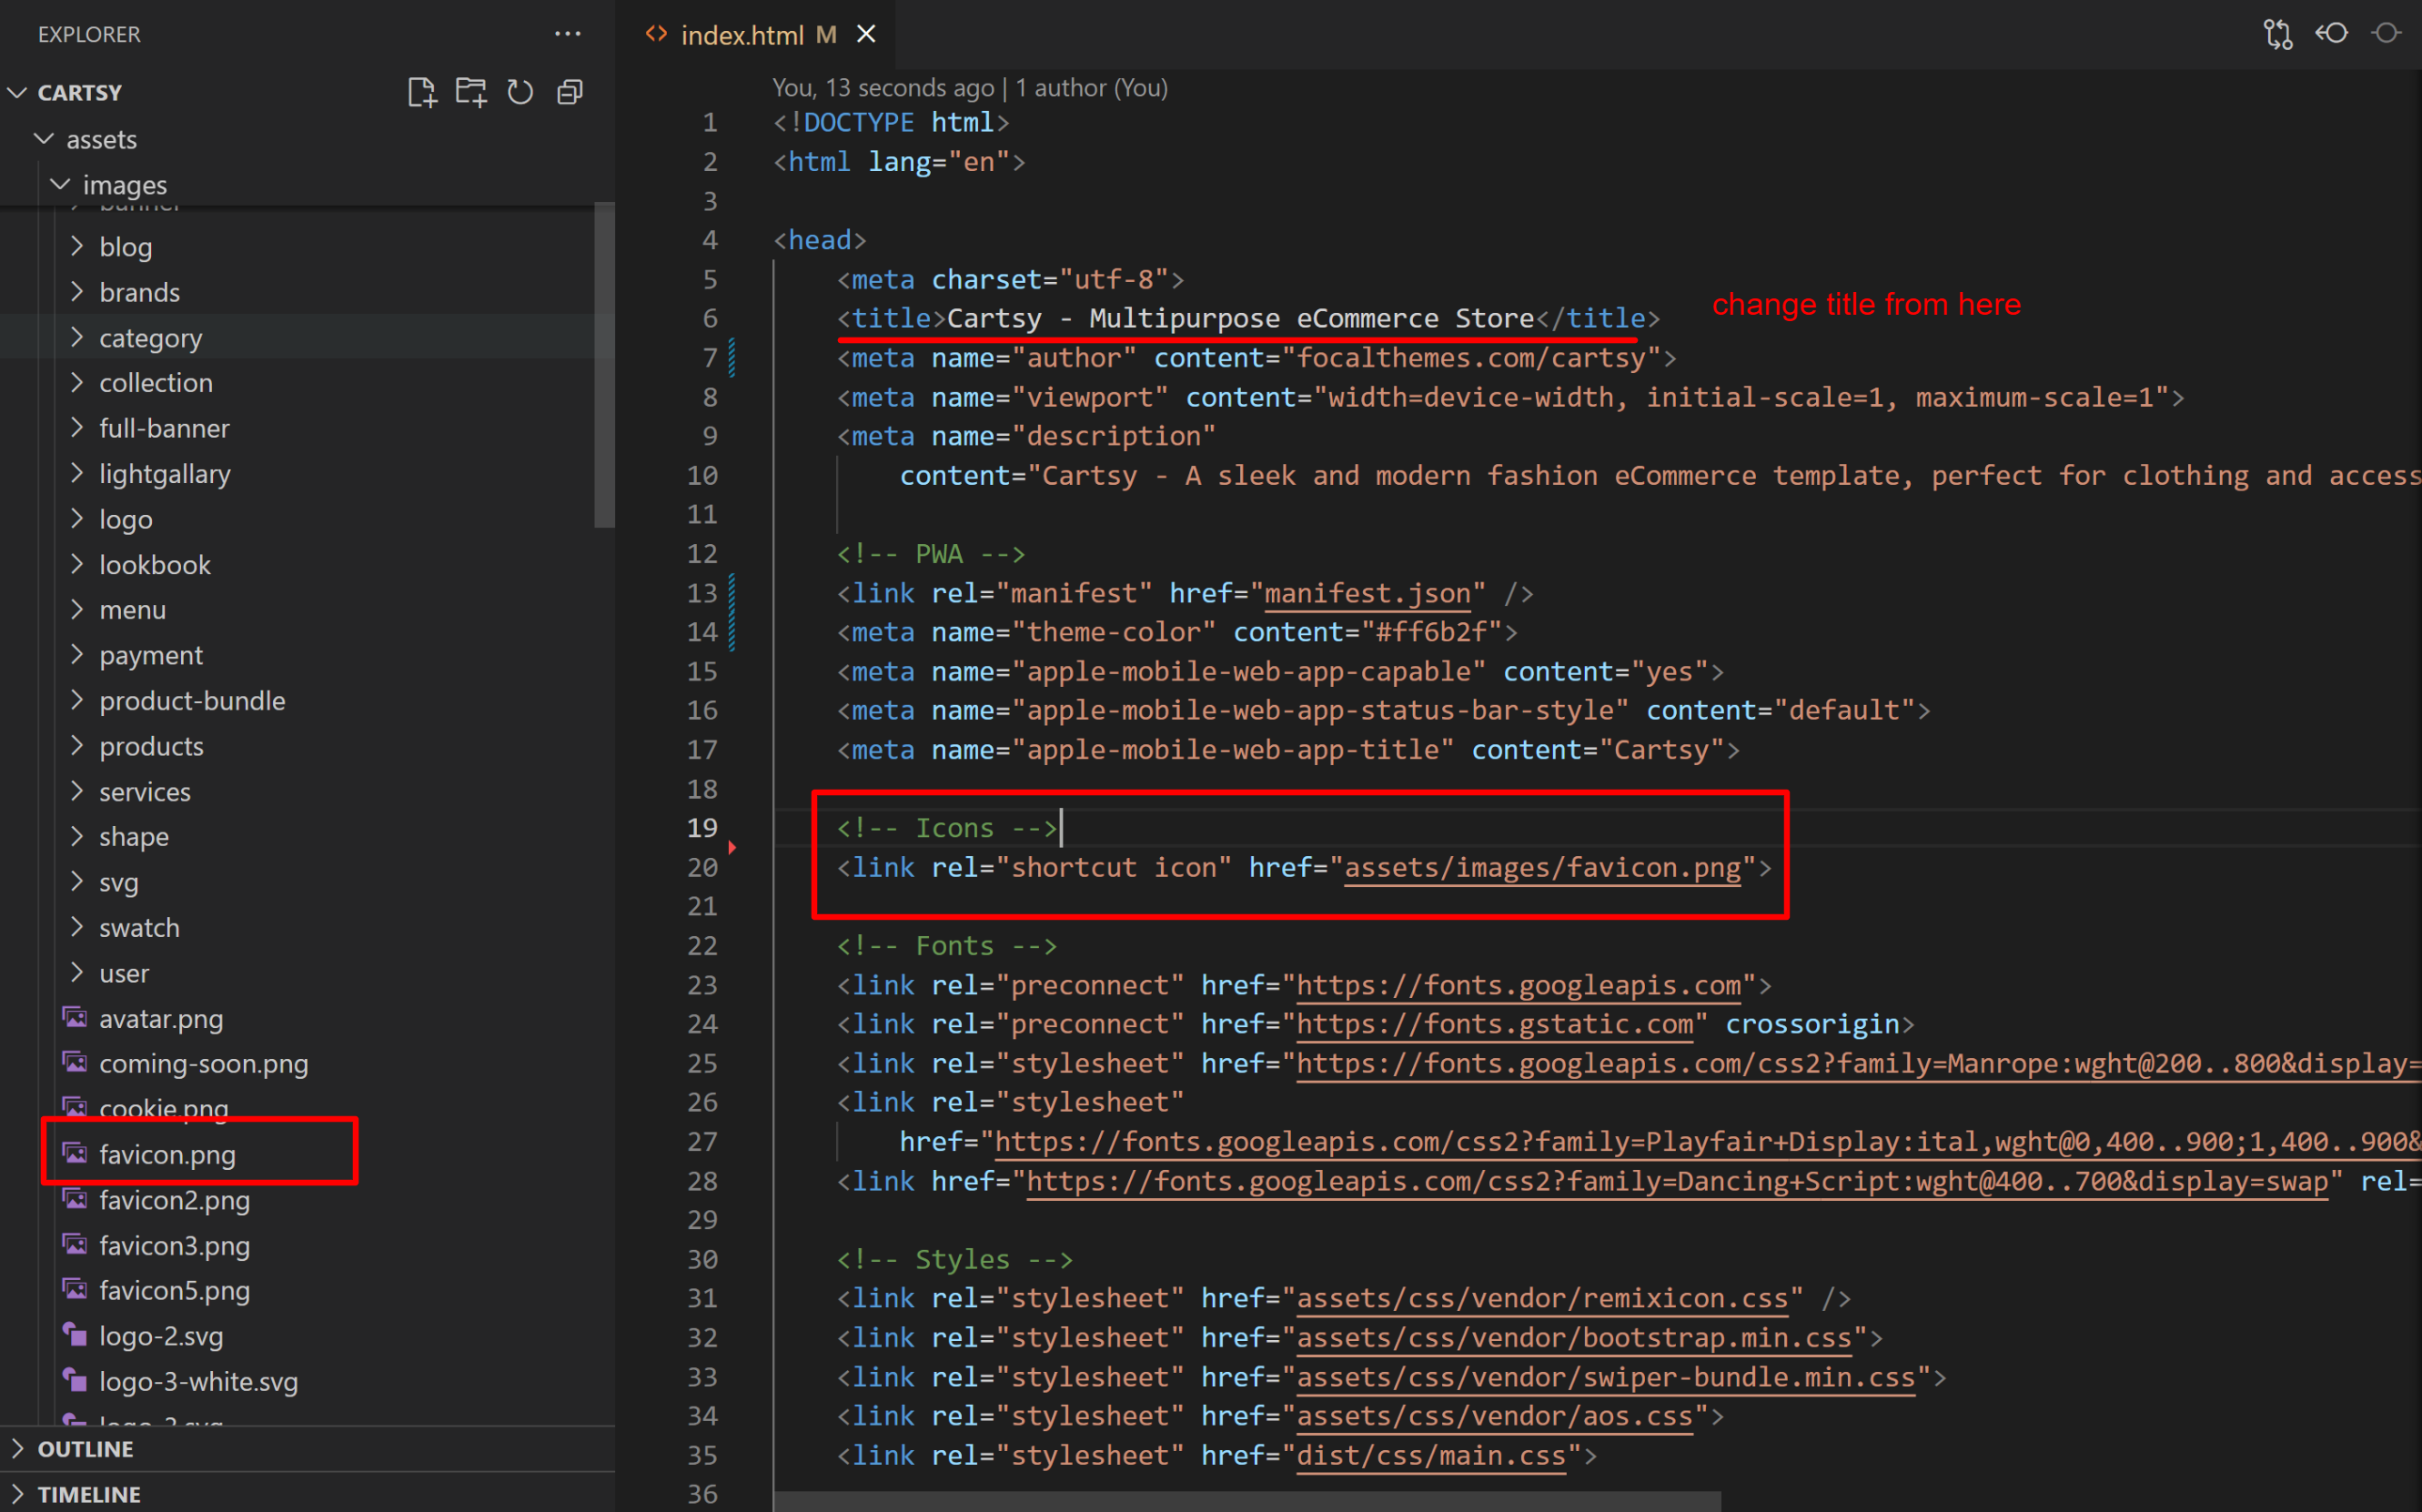
Change Favicon:
Replace the existing favicon inside the assets/images folder with your own favicon file (recommended size: 32x32px). Make sure the file name matches or update the path in the HTML head section:
Change Title:
Update the title tag in the index.html to set your own website title:
FAQs & Troubleshooting
Is this a working
eCommerce store with backend?
No. This is a front-end HTML template. It does not include
backend
functionality like payment gateways or databases. You can integrate it
with your preferred backend or CMS.
No. This is a front-end HTML template. It does not include backend functionality like payment gateways or databases. You can integrate it with your preferred backend or CMS.
Can I use this template
with any framework?
Yes. Since it’s built with clean HTML, CSS, and JavaScript,
you can
integrate it into frameworks such as React, Angular, Vue, Laravel, or
any backend system.
Yes. Since it’s built with clean HTML, CSS, and JavaScript, you can integrate it into frameworks such as React, Angular, Vue, Laravel, or any backend system.
Is this template
responsive?
Yes. The template is fully responsive and optimized for all
screen sizes,
including desktops, tablets, and mobile devices.
Yes. The template is fully responsive and optimized for all screen sizes, including desktops, tablets, and mobile devices.
Do you provide images
with the template?
Demo images are for preview purposes only and are not
included in the
download package. You can replace them with your own images.
Demo images are for preview purposes only and are not included in the download package. You can replace them with your own images.
Can I use this template
for multiple projects?
You’ll need to purchase the appropriate license. The Regular
License
allows use in a single project, while the Extended License is required
if you plan to resell or distribute the end product.
You’ll need to purchase the appropriate license. The Regular License allows use in a single project, while the Extended License is required if you plan to resell or distribute the end product.
Will I get free updates
in the future?
Yes. Once you purchase the template, you’ll receive all
future updates
for free as they are released.
Yes. Once you purchase the template, you’ll receive all future updates for free as they are released.
Do I need coding
knowledge to use this template?
Basic knowledge of HTML and CSS is recommended to customize
the template.
However, the code is clean and well-documented, making it
beginner-friendly.
Basic knowledge of HTML and CSS is recommended to customize the template. However, the code is clean and well-documented, making it beginner-friendly.
Credits & Support
Credits
Support
If you face any issues with the template or need help with customization:
- Email Support: contact@focaltech.in
- Bug Reports: Include the error message, browser version, and steps to reproduce.
- Documentation: Please refer to the full documentation for installation and usage instructions.
We aim to respond to all support queries within 12–24 hours on business days.